Thursday, May 23, 2013

Creating Text with Final Cut Pro HD and Adding It to a Video

The following steps use the Final Cut Pro HD generator called Text, which is the quickest, easiest way to get basic, static text up on the screen. However, these steps work the same way if you want to apply other text generators. If you mess up any of these steps, don't worry about it! You can always undo an action by pressing Command+Z.
1. Open the Viewer window by choosing Window --> Viewer from the main menu.
You can also press Command+1 to open the Viewer.
2. Click the Effects tab in the Browser window.
3. Twirl down the small triangle next to the Video Generators bin, and open the Text sub-bin, which contains the text generators.
4. Double-click the generator named Text (which looks like a small clip with some color bars on it) to open it in the Viewer.
After you open the Text text generator in the Viewer, you can see white text that reads SAMPLE TEXT on the Viewer's Video tab; the Viewer window also sports a new tab titled Controls.
5. Drag the Viewer Controls tab outside the Viewer so that it opens in its own window.
This new Controls tab window lets you type text and edit it, but the Video tab in the Viewer is where you see what the text actually looks like while you finesse it. By dragging the Controls tab outside the Viewer (so that it's in its own window), you can tweak the text and see it displayed in the Viewer's Video tab at the same time.
6. On the Controls tab (now in its own window), replace SAMPLE TEXT and make changes to your text.
To do so, highlight SAMPLE TEXT in the Text field on the Controls tab window and replace it with your own text. For example, you may want to type The End.
7. Tweak the other settings on the Controls tab, if you want.
The other settings in the Text generator Controls tab work like a basic word processor. For example, you can change the font by using the Font pop-up menu. You can also change the location where your text appears on-screen by clicking the Origins cross hair in the Controls tab. Your mouse pointer becomes a cross-hair symbol, and you can then click anywhere in the Viewer window to reposition your text at that spot.
Unfortunately, the Achilles heel of the standard Final Cut Pro Text text generator is that it doesn't let you apply different settings to different parts of the text. All the text has to be the same font, size, and style.
When you make changes, you should see them reflected in the Viewer Video tab. If not, click the Viewer window once, and this should wake it up so that it shows changes while you make them. Then go back to the Controls tab window and tweak away!
8. Change the duration of the generator's text.
By default, all generators create a clip of text that lasts for 10 seconds (after you add the generator's text to your Timeline). To change this setting, highlight the timecode in the Duration field (located in the upper-left corner of the Viewer Video tab) and type a new duration, such as 5:00 for a duration of 5 seconds. Of course, after you place your text on the Timeline, you can also adjust the text clip's length by dragging the clip's edges, just like any other media clip.
9. Move the generator's text to the Timeline to superimpose it over an existing video clip or to make the text appear over a black background, as follows:
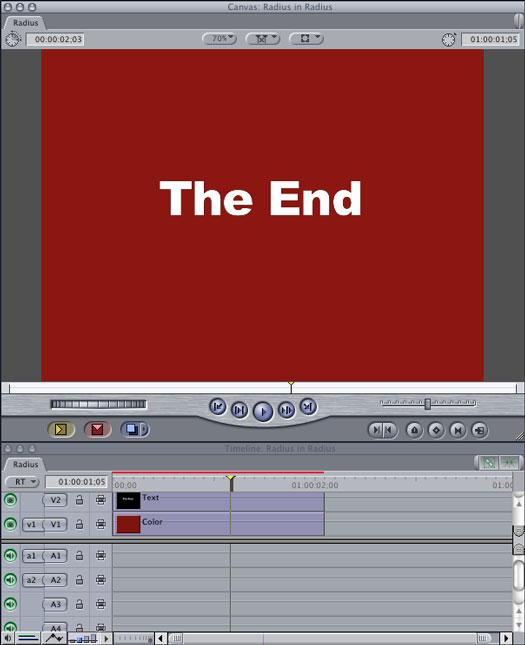
Superimposed over video: To superimpose the text clip over a video clip (for example, to display the name of a person who is currently on camera), first move your video clip to the Timeline, making sure that the Timeline playhead is over this clip. Next, drag the generator's text from the Viewer to the Canvas window, and then select the Superimpose option from the Edit Overlay that appears over the Canvas. The Superimpose edit places the text in a new video track, above your video clip. What's more, Final Cut Pro automatically adjusts the duration of your text to match that of the underlying video clip. Figure 1 shows a text clip superimposed in the Timeline over a video clip.

Figure 1: When placed on top of another clip on the Timeline, the text generator clip is superimposed on the clip beneath it on the Timeline (in this example, a plain-colored background).
Appearing over a black background: If you want the text to appear over a black background (for instance, if you're designing an opening title card), you can drag the text from the Viewer Video tab down to a video track in the Timeline.
10. If necessary, render the text and play it on the Timeline.
If Final Cut Pro is set up for real-time previews of effects, you don't have to render the text to play it. If you see a thin, red bar drawn over the text generator clip in the Timeline, the text clip needs rendering. Select the text generator clip on the Timeline, and then choose Sequence --> Render --> Both from the main menu. After Final Cut Pro completes the rendering, place the playhead just before the text generator clip in the Timeline and press the spacebar to play through the text.
If Final Cut Pro is set up to show real-time previews of text without rendering, the Timeline shows a thin, green bar over the text clip. The text quality you see playing from the Timeline may seem a bit soft or otherwise rough because Final Cut Pro is showing you a lower-resolution preview of the text. When you finally print the movie to tape or export it to a QuickTime digital file, Final Cut Pro renders the text. To see how clearly the text clip appears when it's rendered, select it on the Timeline and choose Sequence --> Render --> Both.
11. Make further adjustments to the text generator by double-clicking it on the Timeline.
Like any clip, the generator opens in the Viewer window, and you can use its now-familiar Controls tab to make tweaks.
After altering any of the text generators, you can drag the text from the Viewer Video tab back to the Browser and rename it in the same way you would rename any old clip. (This way, you have a copy of the clip to apply elsewhere in the project.) Later, you can drag this text as many times as you like into the Timeline. This approach is handy when you need to reuse the same title more than once.
Degenerating and Regenerating in AutoCAD

The image of your drawing that you see displayed on the AutoCAD screen may seem like a simple thing — after all, AutoCAD just has to paint the lines and other objects on the screen as you draw them, right? Unfortunately, it's not that simple.
From the AutoCAD point of view, each drawing has two parts:
  • The important part is the DWG (drawing) file, a highly precise database of objects that is stored on disk. AutoCAD uses high-precision numbers to describe the location of each object.
  • The less important part is the part that you interact with — the on-screen display of the drawing. For displaying your drawing on-screen, AutoCAD uses less-precise integer numbers that are faster for the computer to calculate and that work well with screen displays.
You need to understand the distinction between the highly precise DWG file version of your drawing and the less-precise screen version because it's possible for the two to get out of sync. When this happens, AutoCAD usually displays the puzzling message Regen queued in the command line area. This is another reason why you need to keep an eye on the command line! No, REgen queued is not one of the wine-growing regions of France. It's AutoCAD's way of saying, "What your drawing looks like on the screen at the moment may not exactly match the real version of the drawing database that gets stored when you save the drawing. I'll update the display version at the next regeneration."
A regeneration occurs when AutoCAD goes back to the DWG file and reconverts the high-precision numbers to the less-precise integer numbers that it uses for display purposes. In the process, AutoCAD detects what objects have changed and need to be displayed with their new positions, colors, or linetypes. Normally, AutoCAD picks up on these changes automatically as you go, but in a few cases — again for performance reasons — it takes a regeneration to display them.
You sometimes will see command prompt messages like Regenerating model or Regenerating layout, which indicate that AutoCAD is regenerating the drawing automatically. In fact, if you watch the command line when you open a drawing, you'll notice that AutoCAD always regenerates the drawing as part of the file opening process. You can force a REgen — that is, tell AutoCAD to regenerate the drawing right now, whether it needs it or not — by running the REgen command. You might want to run the REgen command after AutoCAD prompts Regen queued to ensure that what you see on the screen is what you get in the DWG file when you save it.
In AutoCAD 2004, the REGENAUTO system variable is set to 1 (On) by default in new drawings. What does this mean? The REGENAUTO system variable tells AutoCAD whether to do REgens automatically as needed:
  • The default setting in new drawings, 1, tells AutoCAD to regenerate your drawing automatically if it's required to synchronize the screen display with the drawing database.
  • The other setting, 0 (Off), tells AutoCAD not to regenerate automatically, but instead to display Regen queued on the command line and let you force a regeneration with the REgen command if you want to.
If you're working in a large drawing and find performance to be slow because of automatic regenerations, you can turn automatic regeneration off. This speeds performance but requires you to watch for Regen queued messages and force a regeneration manually whenever you want to make sure the on-screen image is in full agreement with the underlying drawing database.
All of this regeneration and REGENAUTO business is for the most part a holdover from much slower computers and older versions of AutoCAD. You probably don't need to subject yourself to the mental contortion of trying to avoid REgens unless you work on huge drawings and/or use a painfully slow computer.
Don't confuse the REgen command with the Redraw command. REgen (View --> Regen) forces the synchronization process described in this section. Redraw (View --> Redraw) simply repaints the screen, without attempting to synchronize the screen with the drawing database. The Redraw command was useful in the days of very slow computers and older versions of AutoCAD, which didn't handle the display as effectively, but it's essentially a useless command now.
The REgenAll command (View --> Regen All) regenerates all viewports in a paper space layout. If you run the REgenAll command in model space, it has the same effect as the ordinary REgen command.

Designing Video Games

A video game is more than the sum of its pieces; a game has a synergy that, after the game is complete, makes it something unique. Creating this synergy takes a lot of technical know-how, as well as a sense of design and art. Basically, you need to be a Leonardo da Vinci and an Albert Einstein all in one.
The basic sequence of game design is as follows:
  • Come up with an idea for a game.
  • Create storyboards and rough sketches of your game world, the main characters, and the action.
  • List the details of your game and take into consideration everything about the game "universe."
  • Finally, put these concepts all together into a design document, something like a movie script that contains everything about your game.

Developing an idea

Before you write a game, you need an idea — a story, something to start with. Brainstorm and come up with an idea for a game; the idea should be loosely based on something that has at least a fleeting resemblance to a story. Then you need to come up with the goals of the game. Ask yourself questions such as "What will the player do?" and "How will the player do it?"
Maybe you're wondering, "Where do I get ideas for games?" Well, you can't tap into any magical formulas, but you can look in a few places:
  • Other games: Don't copy another game, of course, but improving and taking a new perspective within the game is fine.
  • Movies and videos: Watch as many sci-fi movies as possible and see if you can come up with a game based on some of their ideas and content. Of course, you need to get permission from the filmmaker if you use any characters or story lines from those movies.
  • Real-life games: You can take a game such as hockey and make a computer version of it, or make a futuristic version of it.
  • Dreams and nightmares: This technique is a gold mine; in your mind, you can try anything out. Go to sleep thinking about games, demons, monsters, or whatever, and hopefully, you will have a killer dream that gives you an idea for a game.
After you have your game ideas, then you need to outline the story.

Storyboarding

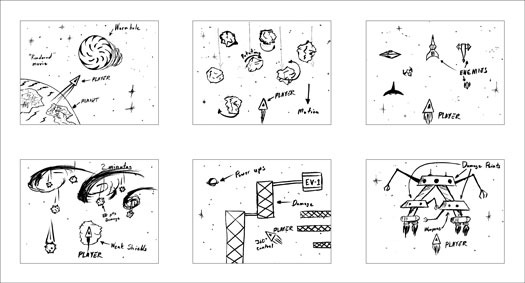
One of the best ways to see a game is to storyboard it — to create a sequence of drawings that show the levels of the game or the different scenes and goals. Each storyboard should include a paragraph or two to describe what is going on. Figure 1 depicts a basic storyboard for an imaginary shoot-'em-up game.

Figure 1: A typical game storyboard.
As you can see, the storyboard has six frames; each frame represents a different level of the game, and the final frame is the goal. Notice that the storyboards are sketched and messy. Storyboard sketches are used only for brainstorming and for getting down on paper the general flow of the game.

Considering the details

After you create storyboards, you write the details of the game design. This stage is where the process gets complex. You have to think of every possible detail and write something about it — because when you make your game, you are a god — well, at least a demigod. If you don't program a specific detail, it's not going to happen.
You need to figure out all the rules and the structure of the game. For example, here's a list of questions to consider:
  • What can the game character do? Can he or she fly, swim, and teleport?
  • How many different enemies will the hero fight?
  • What kind(s) of weapons are available?
  • How does the player get rejuvenated?
  • Can more than one player play at once? If so, what are the ramifications of this?
  • Will the game's perspective be a side view, top view, or first-person and full 3-D view?
  • What kind of sound track? Rock, rap, techno?
  • What is the personality of the main character?
These examples are just some of the details you need to think about. The key here is to create the characters, rules, laws, and goals of your game universe in as much detail as possible. That's necessary because you're going to generate the artificial universe they all exist in. The more detail you include, the better the game will be.

Constructing a design document

After you have all the storyboards and details of the game written down, create a design document. The goal of the document is to record all your ideas in a format that resembles a movie script. Creating the document is a housekeeping step, but it gives you another chance to change your mind, see if some rule or event is totally stupid, or add another game element.
The result of developing the design document is that your imaginary world becomes more vivid in your mind. When you start talking to yourself about the stuff that is happening in your game, when your imaginary world is so thick with texture and so alive with detail that you can see it, then writing a game around it is much easier, because you aren't making things up as you go. Having a clear picture of a game's world is one of the most important issues in game design.
The universe you create must be coherent; it must be well thought out enough to hang together about as well as the universe we live in (or better). If your game universe is coherent, the players will lose themselves in it; they will experience a suspension of disbelief and really have fun. On the other hand, if you come up with a half-baked idea and then wing it as you go, your game ends up looking thrown together, which doesn't invite belief. Without thought or planning, you won't pull the players into your world, and they won't play your game!
After you have a design document in hand, you're in a far better position to create a solid game. As you work on the game, you won't be tempted to impulsively add elements that are inappropriate or out of place in your game's world.
Don't misunderstand. Changing and adding to your design is acceptable, but make sure all the elements work well together. If players aren't distracted by inconsistencies in your game's universe, they can be fully involved with the characters and situations.

SQL Data Types

Here’s a list of all the formal data types that ISO/IEC standard SQL recognizes. In addition to these, you may define additional data types that are derived from these.
Exact Numerics:
  • INTEGER
  • SMALLINT
  • BIGINT
  • NUMERIC
  • DECIMAL
Approximate Numerics:
  • REAL
  • DOUBLE PRECISION
  • FLOAT
Binary Strings:
  • BINARY
  • BINARY VARYING
  • BINARY LARGE OBJECT
Boolean:
  • BOOLEAN
Character Strings:
  • CHARACTER
  • CHARACTER VARYING (VARCHAR)
  • CHARACTER LARGE OBJECT
  • NATIONAL CHARACTER
  • NATIONAL CHARACTER VARYING
  • NATIONAL CHARACTER LARGE OBJECT
Datetimes:
  • DATE
  • TIME WITHOUT TIMEZONE
  • TIMESTAMP WITHOUT TIMEZONE
  • TIME WITH TIMEZONE
  • TIMESTAMP WITH TIMEZONE
Intervals:
  • INTERVAL DAY
  • INTERVAL YEAR
Collection Types:
  • ARRAY
  • MULTISET
Other Types:
  • ROW
  • XML

How to Remove Unwanted Objects in Your Digital Photos

You can easily remove a piece of content (an object, background, or unlikable person) from a digital photo by using your image-editing program. You can replace that removed piece, and no one can even tell that you removed anything. To get rid of something in a digital picture
1

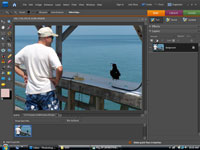
Select the unwanted element with a selection tool, as shown in this figure.

Don’t worry about getting a little of the surrounding image, as long as it doesn’t remove someone else’s arm or the side of a face.
2

Press Delete to get rid of the selected element.

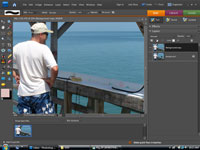
The background layer or any other underlying layer’s content now shows through the hole, like in this figure.
3

Fill the hole with other content.

You can copy content from elsewhere and paste it onto the hole or use the Clone tool to fill in the hole with sampled content from elsewhere in the image, as this figure shows.
If you want to remove a person from a photo but he or she is partially blocking other photo elements, consider bringing someone in from another picture and putting him or her in place of the person you’re deleting.

Securing Your Access 2003 Database as an MDE File

If you make an Access 2003 database for other people — especially people who may be a teeny bit clueless about Access — you may want to lock up your database to prevent other users from making changes that may break it. You can add security in the form of user names and passwords, but a simpler option is to turn your database from an MDB file to an MDE file.
An MDE file is the same as a regular Access MDB database file, with the following changes:
  • All VBA procedures are compiled — converted from human-readable code (more or less readable, anyway) to a format that only the computer understands. This change prevents a database user from reading or changing your VBA code.
  • No one can create forms or reports or modify the existing ones (you can't even open them in Design view). You can't import any, either.
Be sure to keep a copy of your original MDB file! If you need to make changes to your VBA code, forms, or reports (or create new ones), you need to use the MDB file, not the MDE file. MDE files are most commonly used for the front-end database when you split an application into two databases (front end and back end).

Creating an MDE file

Saving your MDB file as an MDE file is easy. Follow these steps:
1. Make sure your database is in Access 2002/2003 file format by opening the database.
Take a look at the title bar of the Database window. (Press F11 if it's not visible.) If the title bar says "(Access 2000 file format)" then you need to convert it to the latest file format.
2. Choose Tools --> Database Utilities --> Make MDE File.
Access closes the database to do the conversion. Then you see the Save MDE As dialog box.
3. Specify the folder and file name for the file and click the Save button.
Access creates the new MDE file while leaving the original MDB file untouched. Then the new MDE file opens.
If Access runs into a problem while making the MDE file, a message appears with a Show Help button. Click the button to find out what's wrong.

Making updates later

Sooner or later, you are going to want to make a new report or fix an annoying typo in a form. You have to go back to your MDB file to make these kinds of changes, because you can't make changes in an MDE file.
If the MDE file is a front-end file, with no data stored in it, you can just make your changes to the original MDB file and resave it as an MDE file. Because all your data lives in the back-end database, you're all set.
However, if your MDE file contains tables full of valuable information, you can't just abandon it. If you use the MDE file to do data entry and editing, that file contains your up-to-date tables. The original MDB file has editable forms, reports, and VBA code, but doesn't have the latest version of the data stored in your tables. Not a problem.
Follow these steps to update your MDE file:
1. Rename your MDE file as a backup file.
For example, add today's date to the end of the file name (right before the .mde part). You're about to create a new MDE file, but you don't want to lose the data in this file.
2. Open the original MDB file and make any changes to contain the forms, reports, and VBA code that you want.
If you plan to make drastic changes, make a backup copy of the MDB first.
3. Choose Tools --> Database Utilities --> Make MDE File and save it as an MDE file with the name that your MDE file originally had.
Now you have an updated MDE file with new, improved forms, reports, and VBA procedures, but with old data. You also have an updated MDB file with your new, improved forms, reports, and VBA code (but out-of-date tables).
4. Delete all the tables from this new MDE file.
In the Database window, click the Tables button in the Objects list, click each table in the list that appears in the right pane and then press the Delete key for each table. You need to confirm each deletion by clicking the Yes button. Deleting tables sounds dangerous, but remember you have all these tables stored safely in your old MDE file.
5. Import the tables from the old MDE file to the new one.
Choose File --> Get External Data --> Import and choose the name you gave your old MDE file in Step 1.
You see the Import Objects dialog box, with tabs for Tables, Queries, Forms, Reports, and other objects.
6. Click the Select All button with the Tables tab selected and then click OK.
Access imports your tables from the original MDE to the new MDE files, replacing the older data in the tables.
7. Import any queries or macros in the old MDE database that you created or changed.
Repeat Steps 5 and 6, but use the Queries and Macros tabs on the Import Objects dialog box to import whatever has changed.
If you are going to do this often, consider splitting your table into a front end and a back end. With a split database, you don't have to re-import your updated tables: You can just leave them in the unchanged back-end database.

How to Draw a Table Line by Line in Word 2007

The Draw Table command lets you draw complicated tables in your Word 2007 documents by using a simple set of drawing tools. This command is ideal for creating tables that aren’t a simple grid of rows and columns.
1

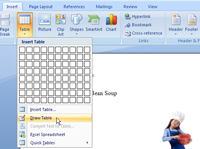
Select the Insert tab, click the Insert Table button in the Tables group, and then choose the Draw Table command.

The cursor changes to a small pencil.
2

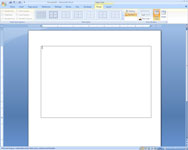
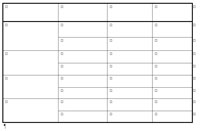
Draw the overall shape of the table by dragging the pencil pointer to create a rectangular boundary.

When you release the mouse button, a table with a single cell is created. In addition, the Ribbon displays the Design tab under Table Tools.
3

Carve the table into smaller cells.

For example, to split the table into two rows, point the cursor somewhere along the left edge of the table and then click and drag a line across the table to the right edge. When you release the mouse button, the table splits into two rows.
You can use this technique to continue carving up the table into smaller cells.
4

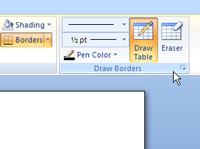
Use the Line Style and Line Weight drop-down controls to change the style or size of lines in the table.

These controls are the top and middle buttons on the left side of the Draw Borders group, located on the Design tab under Table Tools. You can change the style of a line you’ve already drawn by tracing over the line with a new style.
5

If you make a mistake, click the Eraser button and erase the mistaken line segment.

The Eraser button is in the Draw Borders group and looks like a table with an eraser in the corner. Click the Draw Table button if you want to draw additional segments after using the Eraser tool.
6

When you’re done, click anywhere outside of the table.

Custom Search
Powered By Blogger