Thursday, May 23, 2013

Share a Printer on Your Network

Because many households or offices have several computers but only one printer, you need to share the printer on your network. To let everyone on the network print on that printer, share it by following these steps on the Vista computer connected to the printer:

1Click the Start menu, choose Network, and click the Network and Sharing Center button along the top.

2The Network and Sharing Center window appears

Turn on Printer Sharing and click Apply.

3Look in the Printer Sharing category and click the Off button to reveal the menu. When the menu drops down, choose Turn On Printer Sharing and click Apply to share that printer with the network.
Now, tell your other networked PC (or PCs) about your newly shared printer by following these steps:

Click the Start menu, choose Control Panel, and select Printers from the Hardware and Sound category.

4The Printers window lists icons for any installed printers

Click the Add a Printer button.

5The Add Printer window appears

Choose Add a Network, Wireless, or Bluetooth Printer and click Next.

6Your PC glances around the network for the other PCs’ shared printer. When it finds it, click its name and click Next to install it. If it doesn’t find it, move to Step 4.

Choose The Printer That I Want Isn’t Listed and then click Browse to go to the shared printer.

7Clicking the Browse button fetches a list of your networked PCs. Double-click the PC with the attached printer, and Vista lists the printer’s name.

Double-click the shared printer’s icon and click Next.

Vista finally connects to your networked printer. You may also need to install the printer’s software on your PC before it can print to the networked printer.

How to Access Another Computer's Disk Drives from Your Laptop

You can use your laptop to access another computer's disk drives over a network. To be more specific, however, you don't really access the entire disk drive. No, only specific folders on the drive are up for sharing. Even then, your access may be restricted by password, or you can only read, and not write or modify, any files in that folder.
No matter what, if a computer user shares a folder on the network, that folder shows up as available for your laptop to use. Choose Control Panel from the Start menu, and then choose either Network Center (Vista) or Network Connections (XP).
image0.jpg 
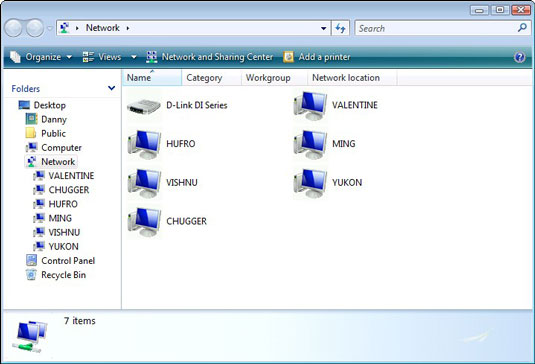
In Windows Vista, open a computer icon in the Network window, shown above, to see whether any folders or disk drives are available.
image1.jpg 
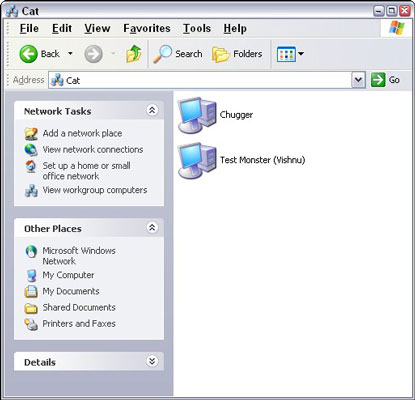
In Windows XP, shared resources are listed directly in the My Network Places window, as shown above.
To access a specific folder, double-click to open it, just as you would open any folder on your own hard drive. The contents of that folder are displayed on the screen, just as though it were a folder on your laptop's hard drive. Remember that the folder isn’t on your hard drive; it's a folder elsewhere on the network.
If the folder is password-protected, you're asked to provide a password for access to the folder.
After the network folder is open, you can access files in the folder just as though they were on your own laptop. Note that some folders can be shared as read-only, in which case the files and folders cannot be renamed or deleted or their contents modified.
Remember to practice polite network etiquette and close a network folder when you’re done using it. If you forget and don't close the folder, a connection still exists between your laptop and the computer sharing that folder. If so, an error message may appear if the network connection goes down or the other computer disconnects from the network.
 dummies.com

Understanding WEP Weaknesses

Security researchers have discovered security problems that let malicious users compromise the security of WLANs (wireless local area network) that use WEP (Wired Equivalent Privacy) — these, for instance:
  • Passive attacks to decrypt traffic: These are based on statistical analysis.
  • Active attacks to inject new traffic from unauthorized mobile stations: These are based on known plaintext.
  • Active attacks to decrypt traffic: These are based on tricking the access point.
  • Dictionary-building attacks: These are possible after analyzing enough traffic on a busy network.
The biggest problem with WEP is when the installer doesn't enable it in the first place. Even bad security is generally better than no security.
When people do use WEP, they forget to change their keys periodically. Having many clients in a wireless network — potentially sharing the identical key for long periods of time — is a well-known security vulnerability. If you keep your key long enough, someone can grab all the frames he needs to crack it.
Can't blame most access-point administrators for not changing keys — after all, the WEP protocol doesn't offer any key management provisions. But the situation is dangerous: When someone in your organization loses a laptop for any reason, the key could become compromised — along with all the other computers sharing the key. So it's worth repeating . . .
Shared keys can compromise a wireless network. As the number of people sharing the key grows, so does the security risk. A fundamental tenet of cryptography is that the security of a system is largely dependent on the secrecy of the keys. Expose the keys and you expose the text. Share the key, and a cracker only has to crack it once. Moreover, when every station uses the same key, an eavesdropper has ready access to a large amount of traffic for analytic attacks.
As if key management problems weren't enough, you have other problems with the WEP algorithm. Check out these bugbears in the WEP initialization vector:
  • The IV is too small and in cleartext. It's a 24-bit field sent in the cleartext portion of a message. This 24-bit string, used to initialize the key stream generated by the RC4 algorithm, is a relatively small field when used for cryptographic purposes.
  • The IV is static. Reuse of the same IV produces identical key streams for the protection of data, and because the IV is short, it guarantees that those streams will repeat after a relatively short time (between 5 and 7 hours) on a busy network.
  • The IV makes the key stream vulnerable. The 802.11 standard does not specify how the IVs are set or changed, and individual wireless adapters from the same vendor may all generate the same IV sequences, or some wireless adapters may possibly use a constant IV. As a result, hackers can record network traffic, determine the key stream, and use it to decrypt the ciphertext.
  • The IV is a part of the RC4 encryption key. The fact that an eavesdropper knows 24-bits of every packet key, combined with a weakness in the RC4 key schedule, leads to a successful analytic attack that recovers the key after intercepting and analyzing only a relatively small amount of traffic. Such an attack is so nearly a no-brainer that it's publicly available as an attack script and as open-source code.
  • WEP provides no cryptographic integrity protection. However, the 802.11 MAC protocol uses a non-cryptographic Cyclic Redundancy Check (CRC) to check the integrity of packets, and acknowledges packets that have the correct checksum. The combination of non-cryptographic checksums with stream ciphers is dangerous — and often introduces vulnerabilities. The classic case? You guessed it: WEP.
    There is an active attack that permits the attacker to decrypt any packet by systematically modifying the packet, and CRC sending it to the AP and noting whether the packet is acknowledged. These kinds of attacks are often subtle, and it is now considered risky to design encryption protocols that do not include cryptographic integrity protection, because of the possibility of interactions with other protocol levels that can give away information about ciphertext.
Only one of the problems listed above depends on a weakness in the cryptographic algorithm. Therefore substituting a stronger stream cipher will not help. For example, the vulnerability of the key stream is a consequence of a weakness in the implementation of the RC4 stream cipher — and that's exposed by a poorly designed protocol.
One flaw in the implementation of the RC4 cipher in WEP is the fact that the 802.11 protocol does not specify how to generate IVs. Remember that IVs are the 24-bit values that are pre-pended to the secret key and used in the RC4 cipher. The IV is transmitted in plaintext. The reason we have IVs is to ensure that the value used as a seed for the RC4 PRNG is always different.
RC4 is quite clear in its requirement that you should never, ever reuse a secret key. The problem with WEP is that there is no guidance on how to implement IVs.
Microsoft uses the RC4 stream cipher in Word and Excel — and makes the mistake of using the same keystream to encrypt two different documents. So you can break Word and Excel encryption by XORing the two ciphertext streams together to get the keystream to dropsout. Using the key stream, you can easily recover the two plaintexts by using letter-frequency analysis and other basic techniques. You'd think Microsoft would learn. But they made the same mistake in 1999 with the Windows NT Syskey.
The key, whether it's 64 or 128 bits, is a combination of a shared secret and the IV. The IV is a 24-bit binary number. Do we choose IV values randomly? Do we start at 0 and increment by 1? Or do we start at 16,777,215 and decrement by 1? Most implementations of WEP initialize hardware using an IV of 0; and increment by 1 for each packet sent. Because every packet requires a unique seed for RC4, you can see that at higher volumes, the entire 24-bit space can be used up in a matter of hours. Therefore we are forced to repeat IVs — and to violate RC4's cardinal rule against ever repeating keys. Ask Microsoft what happens when you do. Statistical analysis shows that all possible IVs (224) are exhausted in about 5 hours. Then the IV re-initializes, starting at 0, every 5 hours.
 dummies.com

Installing and Configuring DNS

The Active Directory Installation wizard offers to install DNS if the wizard does not detect a proper DNS zone configuration during the installation of Active Directory. However, you should not rely on the wizard for these tasks. Many bug reports have been submitted regarding installation bases that relied on the wizard. Also keep in mind that the Active Directory Installation wizard does not install a reverse lookup zone.
The Windows 2000 DNS service can coexist with or migrate other DNS services, including the popular Berkeley Internet Name Domain (BIND) DNS service. One great place to find BIND information is the Internet Software Consortium Web site. To migrate from BIND, you must transfer the BIND zone and boot files to the Microsoft DNS service.
Windows 2000 DNS can also upgrade or coexist with Windows NT 4.0 DNS servers.
For the exam, you should know how to configure DNS for Active Directory. Here is the procedure.
1. Click Start --> Settings --> Control Panel.
2. Double-click Add/Remove Programs and then click Add/Remove Windows Components.
3. In Components, select Networking Services and then click Details.
4. In Subcomponents of Networking Services, select the Domain Name System (DNS) check box, click OK, and then click Next.
5. In Copy Files From, type the full path to the Windows 2000 distribution files and then click OK.
To host Active Directory, you must properly configure DNS with a zone for the Active Directory namespace. You should create both zone types for a proper DNS implementation for your Active Directory namespace — that is, a forward lookup zone and a reverse lookup zone. Read on to discover how.

Creating a forward lookup zone

To create a forward lookup zone:
1. Click Start --> Programs --> Administrative Tools --> DNS.
Windows 2000 launches the DNS Microsoft Management Console, from which you can perform your DNS administration.
2. Expand the DNS server.
3. Right-click the Forward Lookup Zone folder and choose New Zone.
4. Click Next to continue when the New Zone wizard appears.
The wizard takes the pain out of DNS administration.
5. Ensure that Standard Primary is selected and click Next.
6. Ensure that Forward Lookup Zone is selected and click Next.
7. At the New Zone page, type the name of your zone (for example, fordummies.com) and click Next.
8. Select Create a New File With This File Name and click Next.
9. Click Finish.

Creating a reverse lookup zone

To create a reverse lookup zone:
1. Click Start --> Programs --> Administrative Tools --> DNS.
2. Expand the DNS server.
3. Right-click your server and choose New Zone.
4. Click Next to continue when the New Zone wizard appears.
5. Ensure that Standard Primary is selected and click Next.
6. Ensure that Reverse Lookup Zone is selected and click Next.
7. Ensure that Network ID is selected, type your network ID in the Network ID field, and click Next.
8. Select Create a New File With This File Name and click Next.
9. Click Finish.
As far as Active Directory is concerned, your DNS server is almost ready. You should now configure the forward and reverse lookup zones for dynamic updating so that you do not get stuck creating all the records required for Active Directory yourself!

How to Add External Storage to Your PC

1 of 4


Attach one end of a USB cable to the external drive.

A USB cable has distinct ends, so don’t worry about plugging in the wrong one

2 of 4

Plug the other end of the USB cable into your computer.

Your PC should have at least one USB port

3 of 4

If the external storage drive requires power, plug the drive into the wall.

Or better, plug it into a UPS

4 of 4


Turn the drive on if it has an on/off switch. Open the Computer window on your PC.

You may not need to worry about this step because not all drives have this switch.
When you plug the drive into the USB connector, and assuming that the drive has power and is turned on, Windows instantly recognizes the drive and adds it to your computer's list of permanent storage devices, found in the Computer window.

Google announces trio of Nexus devices, Android 4.2 with Miracast and multiple account support

Google was forced to cancel an Android event planned for this morning due to Hurricane Sandy, but the company still went ahead and revealed its revamped Nexus lineup in a blog post. As rumored, a new Nexus phone manufactured by LG will take over as Google’s flagship handset, while an updated Nexus 7 tablet alongside an all-new Nexus 10 model will place a bit of pressure on Apple’s iPad lineup.

Nexus 4

The Nexus 4 smartphone features a 1.5GHz quad-core Snapdragon S4 Pro processor, which Google touts as the fastest on the market, as well as a 4.7-inch 1280 x 768 IPS display, 2GB of RAM, dual cameras (1.3MP front, 8.0MP back), and either 8GB or 16GB of internal storage. Google also baked in NFC support and a wireless charging feature that lets you power the phone by setting it down on an inductive “Charging Orb”.

The latter is somewhat reminiscent of the Palm Touchstore, with the face of the dock set at an angle so you can easily see the phone when charging and magnets inside the Orb preventing it from sliding off.
Google says the Nexus 4 uses the Qi wireless charging standard, so charging pads designed for Nokia's Lumia phones should be compatible too.
On the software side, the Nexus 4 introduces Android 4.2 as a new flavor of Jelly Bean, with support for Miracast (an open alternative to Apple’s Airplay), a new gesture typing keyboard similar to Swipe, a feature called Photo Sphere for creating 360-degree panoramas, among other improvements.
One feature notable missing is support for LTE networks, though. According to The Verge, Google left this feature out in order to have complete control of the software with no carrier intervention -- apparently there's no access to LTE networks without working with carriers in one way or another.
As a result, the Nexus 4 will only be available as an unlocked HSPA+ device starting on November 13 in the US, UK, Canada, Germany, France, Spain and Australia, with other markets around the world getting the phone towards the end of the month. The device will sell for $299 with 8GB of storage or $349 with 16GB. A T-Mobile version will sell unlocked for $199 on a two-year contract.

Nexus 7

Next up, Google announced a couple of updates for the Nexus 7 tablet introduced this past summer. The first relates to storage capacity, which now starts at 16GB for the same $199 or 32GB for $249, and the second is a new model with 32GB of storage and HSPA+ mobile data compatible in 200 markets for $299.
Otherwise, the design of the Asus-made tablet as well as the rest of the specs remain the same. The new Nexus 7 (32GB + Mobile) will be sold via the Google Play Store starting November 13.

Nexus 10

Lastly, Google announced Samsung as its hardware partner for a larger Nexus 10 tablet to rival the full-size iPad. The device features a dual-core ARM Cortex-A15 chip paired with 2GB of RAM, as well as a 10-inch screen at 2560 x 1600 resolution, clocking in at 300ppi. There’s also a 5MP camera on the back, a 1.9MP camera on the front, and a 9,000mAh battery that Google says runs for 9 hours.
Other features include microUSB, Micro HDMI and not one but two NFC chips.
The Nexus 10 also ships with a stock version of Android 4.2 featuring some tablet-specific improvements. Among them is multiple user support for easier sharing (each user gets their own apps and data), a "Daydream" mode that's essentially a screensaver, and a number of accessibility improvements.
The tablet will be available in 16GB and 32GB variants for $399 and $499, respectively, or essentially $100 less than a comparable iPad with Retina display. That price coupled with the device’s high-end specs make this -- at least on paper -- the Android tablet to have in the upper end of the spectrum. But while Android has been incredibly successful in the smartphone arena it still needs to up its game when it comes to tablets, specifically with apps designed with tablets in mind rather than stretched out versions of their smartphone counterparts.
It will be available November 13th in the US, UK, Australia, France, Germany, Spain and Canada.

Other announcements

In addition to the new hardware, Google also announced updates to its voice assistant feature Google Now, which now offers flight information, restaurant reservations, hotel confirmations and shipping details. Meanwhile, Google Play is getting new video content and is launching the music store in Europe.

Built-in advertising: The Windows 8 feature you haven't heard about

Windows 8 has been one of the most anticipated and talked about tech launches of 2012. Discussions intensified as the operating system neared and for the most part, everything went off swimmingly for Redmond. Sure there was the post-RTM update ahead of Microsoft’s October 26 release date but there’s something else with Windows 8 that most aren’t yet aware of: built-in advertising.
The advertisements are reportedly found inside some of the applications that ship with Windows 8 under the Modern UI (Metro) user interface like Finance, News, Travel and Weather. Advertisements in free mobile apps or even trial software are perfectly understandable, but how should you feel about finding ads inside software you paid full price for?
Several prominent figures from around the web are voicing their opinion on the issue, both in defense of the ads and against them. As ZDNet highlights, John Gruber from Daring Fireball simply believes it’s “gross.”  But it’s not just Mac fans that feel that way as Paul Thurrott from Supersite for Windows essentially believes it cheapens the operating system.
ZDNet’s Ed Bott doesn’t feel the issue is nearly as big of a deal as Gruber and Thurrott, however. Instead of seeing this as another revenue stream for Microsoft at the expense of paying customers, he says the ads are simply part of a project from Microsoft designed to inspire Windows 8 app developers.
Granted, the ads themselves aren’t terribly obtrusive. In fact, most say you have do a little digging to find the ads which is probably why we haven’t publically heard about them sooner. As Bott points out, the ad in the News app is found by swiping through seven full screens in landscape move. It’s similarly placed in the Sports app shown above as well.
Have you had an opportunity to try Windows 8 and if so, have you noticed the ads before? How do you feel about them being in a piece of software you’ve already paid full price for?
Custom Search
Powered By Blogger