Thursday, May 23, 2013

Creating Text with Final Cut Pro HD and Adding It to a Video

The following steps use the Final Cut Pro HD generator called Text, which is the quickest, easiest way to get basic, static text up on the screen. However, these steps work the same way if you want to apply other text generators. If you mess up any of these steps, don't worry about it! You can always undo an action by pressing Command+Z.
1. Open the Viewer window by choosing Window --> Viewer from the main menu.
You can also press Command+1 to open the Viewer.
2. Click the Effects tab in the Browser window.
3. Twirl down the small triangle next to the Video Generators bin, and open the Text sub-bin, which contains the text generators.
4. Double-click the generator named Text (which looks like a small clip with some color bars on it) to open it in the Viewer.
After you open the Text text generator in the Viewer, you can see white text that reads SAMPLE TEXT on the Viewer's Video tab; the Viewer window also sports a new tab titled Controls.
5. Drag the Viewer Controls tab outside the Viewer so that it opens in its own window.
This new Controls tab window lets you type text and edit it, but the Video tab in the Viewer is where you see what the text actually looks like while you finesse it. By dragging the Controls tab outside the Viewer (so that it's in its own window), you can tweak the text and see it displayed in the Viewer's Video tab at the same time.
6. On the Controls tab (now in its own window), replace SAMPLE TEXT and make changes to your text.
To do so, highlight SAMPLE TEXT in the Text field on the Controls tab window and replace it with your own text. For example, you may want to type The End.
7. Tweak the other settings on the Controls tab, if you want.
The other settings in the Text generator Controls tab work like a basic word processor. For example, you can change the font by using the Font pop-up menu. You can also change the location where your text appears on-screen by clicking the Origins cross hair in the Controls tab. Your mouse pointer becomes a cross-hair symbol, and you can then click anywhere in the Viewer window to reposition your text at that spot.
Unfortunately, the Achilles heel of the standard Final Cut Pro Text text generator is that it doesn't let you apply different settings to different parts of the text. All the text has to be the same font, size, and style.
When you make changes, you should see them reflected in the Viewer Video tab. If not, click the Viewer window once, and this should wake it up so that it shows changes while you make them. Then go back to the Controls tab window and tweak away!
8. Change the duration of the generator's text.
By default, all generators create a clip of text that lasts for 10 seconds (after you add the generator's text to your Timeline). To change this setting, highlight the timecode in the Duration field (located in the upper-left corner of the Viewer Video tab) and type a new duration, such as 5:00 for a duration of 5 seconds. Of course, after you place your text on the Timeline, you can also adjust the text clip's length by dragging the clip's edges, just like any other media clip.
9. Move the generator's text to the Timeline to superimpose it over an existing video clip or to make the text appear over a black background, as follows:
Superimposed over video: To superimpose the text clip over a video clip (for example, to display the name of a person who is currently on camera), first move your video clip to the Timeline, making sure that the Timeline playhead is over this clip. Next, drag the generator's text from the Viewer to the Canvas window, and then select the Superimpose option from the Edit Overlay that appears over the Canvas. The Superimpose edit places the text in a new video track, above your video clip. What's more, Final Cut Pro automatically adjusts the duration of your text to match that of the underlying video clip. Figure 1 shows a text clip superimposed in the Timeline over a video clip.

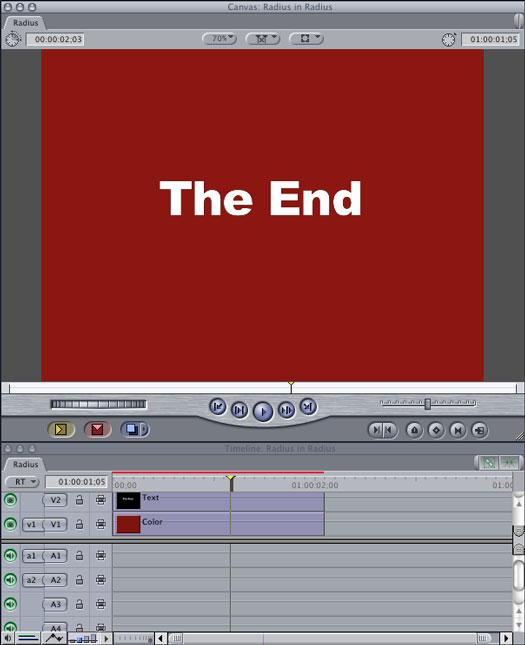
Figure 1: When placed on top of another clip on the Timeline, the text generator clip is superimposed on the clip beneath it on the Timeline (in this example, a plain-colored background).
Appearing over a black background: If you want the text to appear over a black background (for instance, if you're designing an opening title card), you can drag the text from the Viewer Video tab down to a video track in the Timeline.
10. If necessary, render the text and play it on the Timeline.
If Final Cut Pro is set up for real-time previews of effects, you don't have to render the text to play it. If you see a thin, red bar drawn over the text generator clip in the Timeline, the text clip needs rendering. Select the text generator clip on the Timeline, and then choose Sequence --> Render --> Both from the main menu. After Final Cut Pro completes the rendering, place the playhead just before the text generator clip in the Timeline and press the spacebar to play through the text.
If Final Cut Pro is set up to show real-time previews of text without rendering, the Timeline shows a thin, green bar over the text clip. The text quality you see playing from the Timeline may seem a bit soft or otherwise rough because Final Cut Pro is showing you a lower-resolution preview of the text. When you finally print the movie to tape or export it to a QuickTime digital file, Final Cut Pro renders the text. To see how clearly the text clip appears when it's rendered, select it on the Timeline and choose Sequence --> Render --> Both.
11. Make further adjustments to the text generator by double-clicking it on the Timeline.
Like any clip, the generator opens in the Viewer window, and you can use its now-familiar Controls tab to make tweaks.
After altering any of the text generators, you can drag the text from the Viewer Video tab back to the Browser and rename it in the same way you would rename any old clip. (This way, you have a copy of the clip to apply elsewhere in the project.) Later, you can drag this text as many times as you like into the Timeline. This approach is handy when you need to reuse the same title more than once.

Degenerating and Regenerating in AutoCAD

The image of your drawing that you see displayed on the AutoCAD screen may seem like a simple thing — after all, AutoCAD just has to paint the lines and other objects on the screen as you draw them, right? Unfortunately, it's not that simple.
From the AutoCAD point of view, each drawing has two parts:
  • The important part is the DWG (drawing) file, a highly precise database of objects that is stored on disk. AutoCAD uses high-precision numbers to describe the location of each object.
  • The less important part is the part that you interact with — the on-screen display of the drawing. For displaying your drawing on-screen, AutoCAD uses less-precise integer numbers that are faster for the computer to calculate and that work well with screen displays.
You need to understand the distinction between the highly precise DWG file version of your drawing and the less-precise screen version because it's possible for the two to get out of sync. When this happens, AutoCAD usually displays the puzzling message Regen queued in the command line area. This is another reason why you need to keep an eye on the command line! No, REgen queued is not one of the wine-growing regions of France. It's AutoCAD's way of saying, "What your drawing looks like on the screen at the moment may not exactly match the real version of the drawing database that gets stored when you save the drawing. I'll update the display version at the next regeneration."
A regeneration occurs when AutoCAD goes back to the DWG file and reconverts the high-precision numbers to the less-precise integer numbers that it uses for display purposes. In the process, AutoCAD detects what objects have changed and need to be displayed with their new positions, colors, or linetypes. Normally, AutoCAD picks up on these changes automatically as you go, but in a few cases — again for performance reasons — it takes a regeneration to display them.
You sometimes will see command prompt messages like Regenerating model or Regenerating layout, which indicate that AutoCAD is regenerating the drawing automatically. In fact, if you watch the command line when you open a drawing, you'll notice that AutoCAD always regenerates the drawing as part of the file opening process. You can force a REgen — that is, tell AutoCAD to regenerate the drawing right now, whether it needs it or not — by running the REgen command. You might want to run the REgen command after AutoCAD prompts Regen queued to ensure that what you see on the screen is what you get in the DWG file when you save it.
In AutoCAD 2004, the REGENAUTO system variable is set to 1 (On) by default in new drawings. What does this mean? The REGENAUTO system variable tells AutoCAD whether to do REgens automatically as needed:
  • The default setting in new drawings, 1, tells AutoCAD to regenerate your drawing automatically if it's required to synchronize the screen display with the drawing database.
  • The other setting, 0 (Off), tells AutoCAD not to regenerate automatically, but instead to display Regen queued on the command line and let you force a regeneration with the REgen command if you want to.
If you're working in a large drawing and find performance to be slow because of automatic regenerations, you can turn automatic regeneration off. This speeds performance but requires you to watch for Regen queued messages and force a regeneration manually whenever you want to make sure the on-screen image is in full agreement with the underlying drawing database.
All of this regeneration and REGENAUTO business is for the most part a holdover from much slower computers and older versions of AutoCAD. You probably don't need to subject yourself to the mental contortion of trying to avoid REgens unless you work on huge drawings and/or use a painfully slow computer.
Don't confuse the REgen command with the Redraw command. REgen (View --> Regen) forces the synchronization process described in this section. Redraw (View --> Redraw) simply repaints the screen, without attempting to synchronize the screen with the drawing database. The Redraw command was useful in the days of very slow computers and older versions of AutoCAD, which didn't handle the display as effectively, but it's essentially a useless command now.
The REgenAll command (View --> Regen All) regenerates all viewports in a paper space layout. If you run the REgenAll command in model space, it has the same effect as the ordinary REgen command.

Designing Video Games

A video game is more than the sum of its pieces; a game has a synergy that, after the game is complete, makes it something unique. Creating this synergy takes a lot of technical know-how, as well as a sense of design and art. Basically, you need to be a Leonardo da Vinci and an Albert Einstein all in one.
The basic sequence of game design is as follows:
  • Come up with an idea for a game.
  • Create storyboards and rough sketches of your game world, the main characters, and the action.
  • List the details of your game and take into consideration everything about the game "universe."
  • Finally, put these concepts all together into a design document, something like a movie script that contains everything about your game.

Developing an idea

Before you write a game, you need an idea — a story, something to start with. Brainstorm and come up with an idea for a game; the idea should be loosely based on something that has at least a fleeting resemblance to a story. Then you need to come up with the goals of the game. Ask yourself questions such as "What will the player do?" and "How will the player do it?"
Maybe you're wondering, "Where do I get ideas for games?" Well, you can't tap into any magical formulas, but you can look in a few places:
  • Other games: Don't copy another game, of course, but improving and taking a new perspective within the game is fine.
  • Movies and videos: Watch as many sci-fi movies as possible and see if you can come up with a game based on some of their ideas and content. Of course, you need to get permission from the filmmaker if you use any characters or story lines from those movies.
  • Real-life games: You can take a game such as hockey and make a computer version of it, or make a futuristic version of it.
  • Dreams and nightmares: This technique is a gold mine; in your mind, you can try anything out. Go to sleep thinking about games, demons, monsters, or whatever, and hopefully, you will have a killer dream that gives you an idea for a game.
After you have your game ideas, then you need to outline the story.

Storyboarding

One of the best ways to see a game is to storyboard it — to create a sequence of drawings that show the levels of the game or the different scenes and goals. Each storyboard should include a paragraph or two to describe what is going on. Figure 1 depicts a basic storyboard for an imaginary shoot-'em-up game.

Figure 1: A typical game storyboard.
As you can see, the storyboard has six frames; each frame represents a different level of the game, and the final frame is the goal. Notice that the storyboards are sketched and messy. Storyboard sketches are used only for brainstorming and for getting down on paper the general flow of the game.

Considering the details

After you create storyboards, you write the details of the game design. This stage is where the process gets complex. You have to think of every possible detail and write something about it — because when you make your game, you are a god — well, at least a demigod. If you don't program a specific detail, it's not going to happen.
You need to figure out all the rules and the structure of the game. For example, here's a list of questions to consider:
  • What can the game character do? Can he or she fly, swim, and teleport?
  • How many different enemies will the hero fight?
  • What kind(s) of weapons are available?
  • How does the player get rejuvenated?
  • Can more than one player play at once? If so, what are the ramifications of this?
  • Will the game's perspective be a side view, top view, or first-person and full 3-D view?
  • What kind of sound track? Rock, rap, techno?
  • What is the personality of the main character?
These examples are just some of the details you need to think about. The key here is to create the characters, rules, laws, and goals of your game universe in as much detail as possible. That's necessary because you're going to generate the artificial universe they all exist in. The more detail you include, the better the game will be.

Constructing a design document

After you have all the storyboards and details of the game written down, create a design document. The goal of the document is to record all your ideas in a format that resembles a movie script. Creating the document is a housekeeping step, but it gives you another chance to change your mind, see if some rule or event is totally stupid, or add another game element.
The result of developing the design document is that your imaginary world becomes more vivid in your mind. When you start talking to yourself about the stuff that is happening in your game, when your imaginary world is so thick with texture and so alive with detail that you can see it, then writing a game around it is much easier, because you aren't making things up as you go. Having a clear picture of a game's world is one of the most important issues in game design.
The universe you create must be coherent; it must be well thought out enough to hang together about as well as the universe we live in (or better). If your game universe is coherent, the players will lose themselves in it; they will experience a suspension of disbelief and really have fun. On the other hand, if you come up with a half-baked idea and then wing it as you go, your game ends up looking thrown together, which doesn't invite belief. Without thought or planning, you won't pull the players into your world, and they won't play your game!
After you have a design document in hand, you're in a far better position to create a solid game. As you work on the game, you won't be tempted to impulsively add elements that are inappropriate or out of place in your game's world.
Don't misunderstand. Changing and adding to your design is acceptable, but make sure all the elements work well together. If players aren't distracted by inconsistencies in your game's universe, they can be fully involved with the characters and situations.

SQL Data Types

Here’s a list of all the formal data types that ISO/IEC standard SQL recognizes. In addition to these, you may define additional data types that are derived from these.
Exact Numerics:
  • INTEGER
  • SMALLINT
  • BIGINT
  • NUMERIC
  • DECIMAL
Approximate Numerics:
  • REAL
  • DOUBLE PRECISION
  • FLOAT
Binary Strings:
  • BINARY
  • BINARY VARYING
  • BINARY LARGE OBJECT
Boolean:
  • BOOLEAN
Character Strings:
  • CHARACTER
  • CHARACTER VARYING (VARCHAR)
  • CHARACTER LARGE OBJECT
  • NATIONAL CHARACTER
  • NATIONAL CHARACTER VARYING
  • NATIONAL CHARACTER LARGE OBJECT
Datetimes:
  • DATE
  • TIME WITHOUT TIMEZONE
  • TIMESTAMP WITHOUT TIMEZONE
  • TIME WITH TIMEZONE
  • TIMESTAMP WITH TIMEZONE
Intervals:
  • INTERVAL DAY
  • INTERVAL YEAR
Collection Types:
  • ARRAY
  • MULTISET
Other Types:
  • ROW
  • XML

How to Remove Unwanted Objects in Your Digital Photos

You can easily remove a piece of content (an object, background, or unlikable person) from a digital photo by using your image-editing program. You can replace that removed piece, and no one can even tell that you removed anything. To get rid of something in a digital picture
1

Select the unwanted element with a selection tool, as shown in this figure.

Don’t worry about getting a little of the surrounding image, as long as it doesn’t remove someone else’s arm or the side of a face.
2

Press Delete to get rid of the selected element.

The background layer or any other underlying layer’s content now shows through the hole, like in this figure.
3

Fill the hole with other content.

You can copy content from elsewhere and paste it onto the hole or use the Clone tool to fill in the hole with sampled content from elsewhere in the image, as this figure shows.
If you want to remove a person from a photo but he or she is partially blocking other photo elements, consider bringing someone in from another picture and putting him or her in place of the person you’re deleting.

Securing Your Access 2003 Database as an MDE File

If you make an Access 2003 database for other people — especially people who may be a teeny bit clueless about Access — you may want to lock up your database to prevent other users from making changes that may break it. You can add security in the form of user names and passwords, but a simpler option is to turn your database from an MDB file to an MDE file.
An MDE file is the same as a regular Access MDB database file, with the following changes:
  • All VBA procedures are compiled — converted from human-readable code (more or less readable, anyway) to a format that only the computer understands. This change prevents a database user from reading or changing your VBA code.
  • No one can create forms or reports or modify the existing ones (you can't even open them in Design view). You can't import any, either.
Be sure to keep a copy of your original MDB file! If you need to make changes to your VBA code, forms, or reports (or create new ones), you need to use the MDB file, not the MDE file. MDE files are most commonly used for the front-end database when you split an application into two databases (front end and back end).

Creating an MDE file

Saving your MDB file as an MDE file is easy. Follow these steps:
1. Make sure your database is in Access 2002/2003 file format by opening the database.
Take a look at the title bar of the Database window. (Press F11 if it's not visible.) If the title bar says "(Access 2000 file format)" then you need to convert it to the latest file format.
2. Choose Tools --> Database Utilities --> Make MDE File.
Access closes the database to do the conversion. Then you see the Save MDE As dialog box.
3. Specify the folder and file name for the file and click the Save button.
Access creates the new MDE file while leaving the original MDB file untouched. Then the new MDE file opens.
If Access runs into a problem while making the MDE file, a message appears with a Show Help button. Click the button to find out what's wrong.

Making updates later

Sooner or later, you are going to want to make a new report or fix an annoying typo in a form. You have to go back to your MDB file to make these kinds of changes, because you can't make changes in an MDE file.
If the MDE file is a front-end file, with no data stored in it, you can just make your changes to the original MDB file and resave it as an MDE file. Because all your data lives in the back-end database, you're all set.
However, if your MDE file contains tables full of valuable information, you can't just abandon it. If you use the MDE file to do data entry and editing, that file contains your up-to-date tables. The original MDB file has editable forms, reports, and VBA code, but doesn't have the latest version of the data stored in your tables. Not a problem.
Follow these steps to update your MDE file:
1. Rename your MDE file as a backup file.
For example, add today's date to the end of the file name (right before the .mde part). You're about to create a new MDE file, but you don't want to lose the data in this file.
2. Open the original MDB file and make any changes to contain the forms, reports, and VBA code that you want.
If you plan to make drastic changes, make a backup copy of the MDB first.
3. Choose Tools --> Database Utilities --> Make MDE File and save it as an MDE file with the name that your MDE file originally had.
Now you have an updated MDE file with new, improved forms, reports, and VBA procedures, but with old data. You also have an updated MDB file with your new, improved forms, reports, and VBA code (but out-of-date tables).
4. Delete all the tables from this new MDE file.
In the Database window, click the Tables button in the Objects list, click each table in the list that appears in the right pane and then press the Delete key for each table. You need to confirm each deletion by clicking the Yes button. Deleting tables sounds dangerous, but remember you have all these tables stored safely in your old MDE file.
5. Import the tables from the old MDE file to the new one.
Choose File --> Get External Data --> Import and choose the name you gave your old MDE file in Step 1.
You see the Import Objects dialog box, with tabs for Tables, Queries, Forms, Reports, and other objects.
6. Click the Select All button with the Tables tab selected and then click OK.
Access imports your tables from the original MDE to the new MDE files, replacing the older data in the tables.
7. Import any queries or macros in the old MDE database that you created or changed.
Repeat Steps 5 and 6, but use the Queries and Macros tabs on the Import Objects dialog box to import whatever has changed.
If you are going to do this often, consider splitting your table into a front end and a back end. With a split database, you don't have to re-import your updated tables: You can just leave them in the unchanged back-end database.

How to Draw a Table Line by Line in Word 2007

The Draw Table command lets you draw complicated tables in your Word 2007 documents by using a simple set of drawing tools. This command is ideal for creating tables that aren’t a simple grid of rows and columns.
1

Select the Insert tab, click the Insert Table button in the Tables group, and then choose the Draw Table command.

The cursor changes to a small pencil.
2

Draw the overall shape of the table by dragging the pencil pointer to create a rectangular boundary.

When you release the mouse button, a table with a single cell is created. In addition, the Ribbon displays the Design tab under Table Tools.
3

Carve the table into smaller cells.

For example, to split the table into two rows, point the cursor somewhere along the left edge of the table and then click and drag a line across the table to the right edge. When you release the mouse button, the table splits into two rows.
You can use this technique to continue carving up the table into smaller cells.
4

Use the Line Style and Line Weight drop-down controls to change the style or size of lines in the table.

These controls are the top and middle buttons on the left side of the Draw Borders group, located on the Design tab under Table Tools. You can change the style of a line you’ve already drawn by tracing over the line with a new style.
5

If you make a mistake, click the Eraser button and erase the mistaken line segment.

The Eraser button is in the Draw Borders group and looks like a table with an eraser in the corner. Click the Draw Table button if you want to draw additional segments after using the Eraser tool.
6

When you’re done, click anywhere outside of the table.

Share a Printer on Your Network

Because many households or offices have several computers but only one printer, you need to share the printer on your network. To let everyone on the network print on that printer, share it by following these steps on the Vista computer connected to the printer:

1Click the Start menu, choose Network, and click the Network and Sharing Center button along the top.

2The Network and Sharing Center window appears

Turn on Printer Sharing and click Apply.

3Look in the Printer Sharing category and click the Off button to reveal the menu. When the menu drops down, choose Turn On Printer Sharing and click Apply to share that printer with the network.
Now, tell your other networked PC (or PCs) about your newly shared printer by following these steps:

Click the Start menu, choose Control Panel, and select Printers from the Hardware and Sound category.

4The Printers window lists icons for any installed printers

Click the Add a Printer button.

5The Add Printer window appears

Choose Add a Network, Wireless, or Bluetooth Printer and click Next.

6Your PC glances around the network for the other PCs’ shared printer. When it finds it, click its name and click Next to install it. If it doesn’t find it, move to Step 4.

Choose The Printer That I Want Isn’t Listed and then click Browse to go to the shared printer.

7Clicking the Browse button fetches a list of your networked PCs. Double-click the PC with the attached printer, and Vista lists the printer’s name.

Double-click the shared printer’s icon and click Next.

Vista finally connects to your networked printer. You may also need to install the printer’s software on your PC before it can print to the networked printer.

How to Access Another Computer's Disk Drives from Your Laptop

You can use your laptop to access another computer's disk drives over a network. To be more specific, however, you don't really access the entire disk drive. No, only specific folders on the drive are up for sharing. Even then, your access may be restricted by password, or you can only read, and not write or modify, any files in that folder.
No matter what, if a computer user shares a folder on the network, that folder shows up as available for your laptop to use. Choose Control Panel from the Start menu, and then choose either Network Center (Vista) or Network Connections (XP).
image0.jpg 
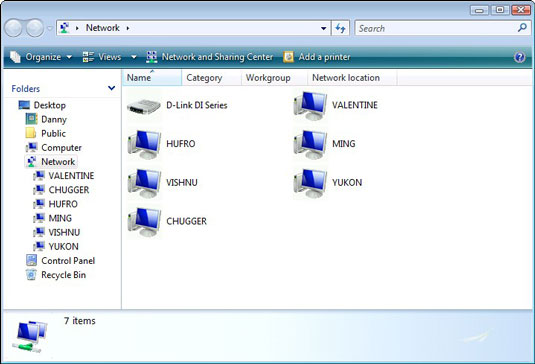
In Windows Vista, open a computer icon in the Network window, shown above, to see whether any folders or disk drives are available.
image1.jpg 
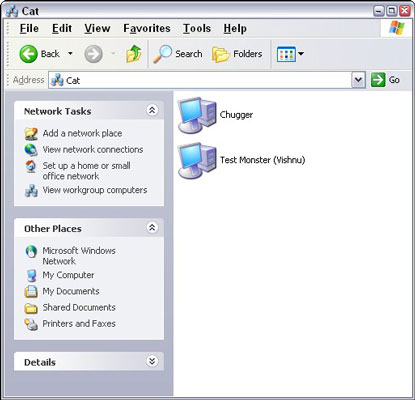
In Windows XP, shared
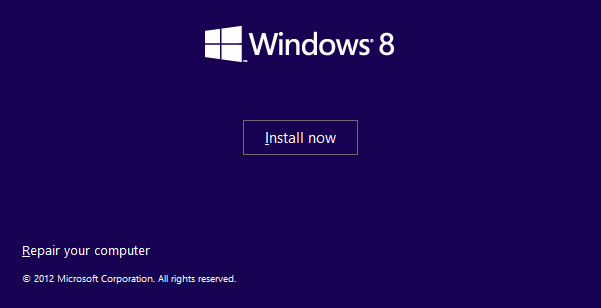
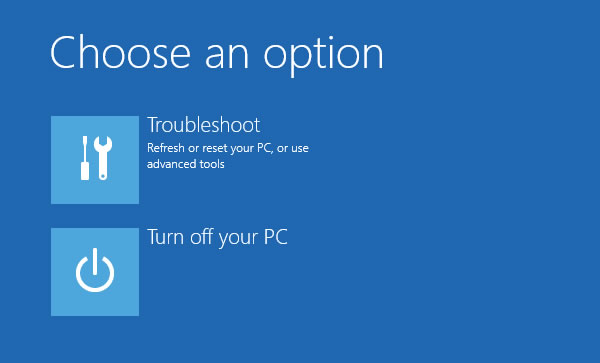
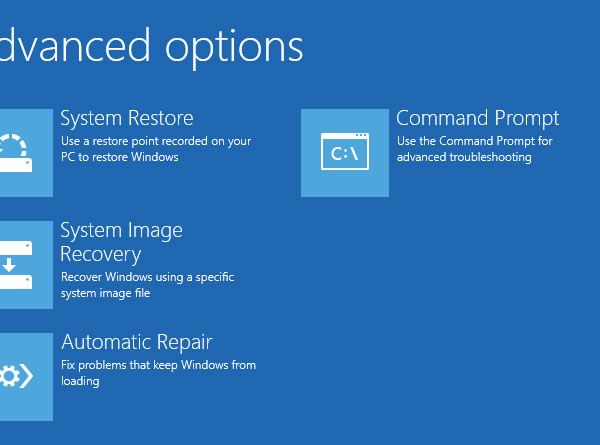
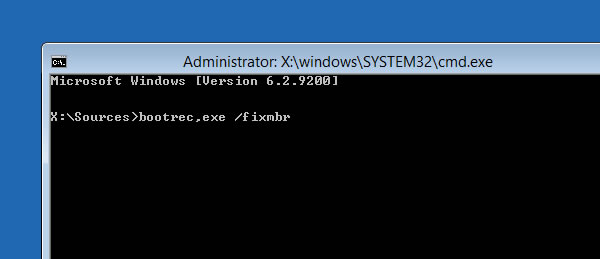
 resources are listed directly in the My Network Places window, as shown above.
To access a specific folder, double-click to open it, just as you would open any folder on your own hard drive. The contents of that folder are displayed on the screen, just as though it were a folder on your laptop's hard drive. Remember that the folder isn’t on your hard drive; it's a folder elsewhere on the network.
If the folder is password-protected, you're asked to provide a password for access to the folder.
After the network folder is open, you can access files in the folder just as though they were on your own laptop. Note that some folders can be shared as read-only, in which case the files and folders cannot be renamed or deleted or their contents modified.
Remember to practice polite network etiquette and close a network folder when you’re done using it. If you forget and don't close the folder, a connection still exists between your laptop and the computer sharing that folder. If so, an error message may appear if the network connection goes down or the other computer disconnects from the network.
 dummies.com

Understanding WEP Weaknesses

Security researchers have discovered security problems that let malicious users compromise the security of WLANs (wireless local area network) that use WEP (Wired Equivalent Privacy) — these, for instance:
  • Passive attacks to decrypt traffic: These are based on statistical analysis.
  • Active attacks to inject new traffic from unauthorized mobile stations: These are based on known plaintext.
  • Active attacks to decrypt traffic: These are based on tricking the access point.
  • Dictionary-building attacks: These are possible after analyzing enough traffic on a busy network.
The biggest problem with WEP is when the installer doesn't enable it in the first place. Even bad security is generally better than no security.
When people do use WEP, they forget to change their keys periodically. Having many clients in a wireless network — potentially sharing the identical key for long periods of time — is a well-known security vulnerability. If you keep your key long enough, someone can grab all the frames he needs to crack it.
Can't blame most access-point administrators for not changing keys — after all, the WEP protocol doesn't offer any key management provisions. But the situation is dangerous: When someone in your organization loses a laptop for any reason, the key could become compromised — along with all the other computers sharing the key. So it's worth repeating . . .
Shared keys can compromise a wireless network. As the number of people sharing the key grows, so does the security risk. A fundamental tenet of cryptography is that the security of a system is largely dependent on the secrecy of the keys. Expose the keys and you expose the text. Share the key, and a cracker only has to crack it once. Moreover, when every station uses the same key, an eavesdropper has ready access to a large amount of traffic for analytic attacks.
As if key management problems weren't enough, you have other problems with the WEP algorithm. Check out these bugbears in the WEP initialization vector:
  • The IV is too small and in cleartext. It's a 24-bit field sent in the cleartext portion of a message. This 24-bit string, used to initialize the key stream generated by the RC4 algorithm, is a relatively small field when used for cryptographic purposes.
  • The IV is static. Reuse of the same IV produces identical key streams for the protection of data, and because the IV is short, it guarantees that those streams will repeat after a relatively short time (between 5 and 7 hours) on a busy network.
  • The IV makes the key stream vulnerable. The 802.11 standard does not specify how the IVs are set or changed, and individual wireless adapters from the same vendor may all generate the same IV sequences, or some wireless adapters may possibly use a constant IV. As a result, hackers can record network traffic, determine the key stream, and use it to decrypt the ciphertext.
  • The IV is a part of the RC4 encryption key. The fact that an eavesdropper knows 24-bits of every packet key, combined with a weakness in the RC4 key schedule, leads to a successful analytic attack that recovers the key after intercepting and analyzing only a relatively small amount of traffic. Such an attack is so nearly a no-brainer that it's publicly available as an attack script and as open-source code.
  • WEP provides no cryptographic integrity protection. However, the 802.11 MAC protocol uses a non-cryptographic Cyclic Redundancy Check (CRC) to check the integrity of packets, and acknowledges packets that have the correct checksum. The combination of non-cryptographic checksums with stream ciphers is dangerous — and often introduces vulnerabilities. The classic case? You guessed it: WEP.
    There is an active attack that permits the attacker to decrypt any packet by systematically modifying the packet, and CRC sending it to the AP and noting whether the packet is acknowledged. These kinds of attacks are often subtle, and it is now considered risky to design encryption protocols that do not include cryptographic integrity protection, because of the possibility of interactions with other protocol levels that can give away information about ciphertext.
Only one of the problems listed above depends on a weakness in the cryptographic algorithm. Therefore substituting a stronger stream cipher will not help. For example, the vulnerability of the key stream is a consequence of a weakness in the implementation of the RC4 stream cipher — and that's exposed by a poorly designed protocol.
One flaw in the implementation of the RC4 cipher in WEP is the fact that the 802.11 protocol does not specify how to generate IVs. Remember that IVs are the 24-bit values that are pre-pended to the secret key and used in the RC4 cipher. The IV is transmitted in plaintext. The reason we have IVs is to ensure that the value used as a seed for the RC4 PRNG is always different.
RC4 is quite clear in its requirement that you should never, ever reuse a secret key. The problem with WEP is that there is no guidance on how to implement IVs.
Microsoft uses the RC4 stream cipher in Word and Excel — and makes the mistake of using the same keystream to encrypt two different documents. So you can break Word and Excel encryption by XORing the two ciphertext streams together to get the keystream to dropsout. Using the key stream, you can easily recover the two plaintexts by using letter-frequency analysis and other basic techniques. You'd think Microsoft would learn. But they made the same mistake in 1999 with the Windows NT Syskey.
The key, whether it's 64 or 128 bits, is a combination of a shared secret and the IV. The IV is a 24-bit binary number. Do we choose IV values randomly? Do we start at 0 and increment by 1? Or do we start at 16,777,215 and decrement by 1? Most implementations of WEP initialize hardware using an IV of 0; and increment by 1 for each packet sent. Because every packet requires a unique seed for RC4, you can see that at higher volumes, the entire 24-bit space can be used up in a matter of hours. Therefore we are forced to repeat IVs — and to violate RC4's cardinal rule against ever repeating keys. Ask Microsoft what happens when you do. Statistical analysis shows that all possible IVs (224) are exhausted in about 5 hours. Then the IV re-initializes, starting at 0, every 5 hours.
 dummies.com

Installing and Configuring DNS

The Active Directory Installation wizard offers to install DNS if the wizard does not detect a proper DNS zone configuration during the installation of Active Directory. However, you should not rely on the wizard for these tasks. Many bug reports have been submitted regarding installation bases that relied on the wizard. Also keep in mind that the Active Directory Installation wizard does not install a reverse lookup zone.
The Windows 2000 DNS service can coexist with or migrate other DNS services, including the popular Berkeley Internet Name Domain (BIND) DNS service. One great place to find BIND information is the Internet Software Consortium Web site. To migrate from BIND, you must transfer the BIND zone and boot files to the Microsoft DNS service.
Windows 2000 DNS can also upgrade or coexist with Windows NT 4.0 DNS servers.
For the exam, you should know how to configure DNS for Active Directory. Here is the procedure.
1. Click Start --> Settings --> Control Panel.
2. Double-click Add/Remove Programs and then click Add/Remove Windows Components.
3. In Components, select Networking Services and then click Details.
4. In Subcomponents of Networking Services, select the Domain Name System (DNS) check box, click OK, and then click Next.
5. In Copy Files From, type the full path to the Windows 2000 distribution files and then click OK.
To host Active Directory, you must properly configure DNS with a zone for the Active Directory namespace. You should create both zone types for a proper DNS implementation for your Active Directory namespace — that is, a forward lookup zone and a reverse lookup zone. Read on to discover how.

Creating a forward lookup zone

To create a forward lookup zone:
1. Click Start --> Programs --> Administrative Tools --> DNS.
Windows 2000 launches the DNS Microsoft Management Console, from which you can perform your DNS administration.
2. Expand the DNS server.
3. Right-click the Forward Lookup Zone folder and choose New Zone.
4. Click Next to continue when the New Zone wizard appears.
The wizard takes the pain out of DNS administration.
5. Ensure that Standard Primary is selected and click Next.
6. Ensure that Forward Lookup Zone is selected and click Next.
7. At the New Zone page, type the name of your zone (for example, fordummies.com) and click Next.
8. Select Create a New File With This File Name and click Next.
9. Click Finish.

Creating a reverse lookup zone

To create a reverse lookup zone:
1. Click Start --> Programs --> Administrative Tools --> DNS.
2. Expand the DNS server.
3. Right-click your server and choose New Zone.
4. Click Next to continue when the New Zone wizard appears.
5. Ensure that Standard Primary is selected and click Next.
6. Ensure that Reverse Lookup Zone is selected and click Next.
7. Ensure that Network ID is selected, type your network ID in the Network ID field, and click Next.
8. Select Create a New File With This File Name and click Next.
9. Click Finish.
As far as Active Directory is concerned, your DNS server is almost ready. You should now configure the forward and reverse lookup zones for dynamic updating so that you do not get stuck creating all the records required for Active Directory yourself!

How to Add External Storage to Your PC

1 of 4


Attach one end of a USB cable to the external drive.

A USB cable has distinct ends, so don’t worry about plugging in the wrong one

2 of 4

Plug the other end of the USB cable into your computer.

Your PC should have at least one USB port

3 of 4

If the external storage drive requires power, plug the drive into the wall.

Or better, plug it into a UPS

4 of 4


Turn the drive on if it has an on/off switch. Open the Computer window on your PC.

You may not need to worry about this step because not all drives have this switch.
When you plug the drive into the USB connector, and assuming that the drive has power and is turned on, Windows instantly recognizes the drive and adds it to your computer's list of permanent storage devices, found in the Computer window.

Google announces trio of Nexus devices, Android 4.2 with Miracast and multiple account support

Google was forced to cancel an Android event planned for this morning due to Hurricane Sandy, but the company still went ahead and revealed its revamped Nexus lineup in a blog post. As rumored, a new Nexus phone manufactured by LG will take over as Google’s flagship handset, while an updated Nexus 7 tablet alongside an all-new Nexus 10 model will place a bit of pressure on Apple’s iPad lineup.

Nexus 4

The Nexus 4 smartphone features a 1.5GHz quad-core Snapdragon S4 Pro processor, which Google touts as the fastest on the market, as well as a 4.7-inch 1280 x 768 IPS display, 2GB of RAM, dual cameras (1.3MP front, 8.0MP back), and either 8GB or 16GB of internal storage. Google also baked in NFC support and a wireless charging feature that lets you power the phone by setting it down on an inductive “Charging Orb”.

The latter is somewhat reminiscent of the Palm Touchstore, with the face of the dock set at an angle so you can easily see the phone when charging and magnets inside the Orb preventing it from sliding off.
Google says the Nexus 4 uses the Qi wireless charging standard, so charging pads designed for Nokia's Lumia phones should be compatible too.
On the software side, the Nexus 4 introduces Android 4.2 as a new flavor of Jelly Bean, with support for Miracast (an open alternative to Apple’s Airplay), a new gesture typing keyboard similar to Swipe, a feature called Photo Sphere for creating 360-degree panoramas, among other improvements.
One feature notable missing is support for LTE networks, though. According to The Verge, Google left this feature out in order to have complete control of the software with no carrier intervention -- apparently there's no access to LTE networks without working with carriers in one way or another.
As a result, the Nexus 4 will only be available as an unlocked HSPA+ device starting on November 13 in the US, UK, Canada, Germany, France, Spain and Australia, with other markets around the world getting the phone towards the end of the month. The device will sell for $299 with 8GB of storage or $349 with 16GB. A T-Mobile version will sell unlocked for $199 on a two-year contract.

Nexus 7

Next up, Google announced a couple of updates for the Nexus 7 tablet introduced this past summer. The first relates to storage capacity, which now starts at 16GB for the same $199 or 32GB for $249, and the second is a new model with 32GB of storage and HSPA+ mobile data compatible in 200 markets for $299.
Otherwise, the design of the Asus-made tablet as well as the rest of the specs remain the same. The new Nexus 7 (32GB + Mobile) will be sold via the Google Play Store starting November 13.

Nexus 10

Lastly, Google announced Samsung as its hardware partner for a larger Nexus 10 tablet to rival the full-size iPad. The device features a dual-core ARM Cortex-A15 chip paired with 2GB of RAM, as well as a 10-inch screen at 2560 x 1600 resolution, clocking in at 300ppi. There’s also a 5MP camera on the back, a 1.9MP camera on the front, and a 9,000mAh battery that Google says runs for 9 hours.
Other features include microUSB, Micro HDMI and not one but two NFC chips.
The Nexus 10 also ships with a stock version of Android 4.2 featuring some tablet-specific improvements. Among them is multiple user support for easier sharing (each user gets their own apps and data), a "Daydream" mode that's essentially a screensaver, and a number of accessibility improvements.
The tablet will be available in 16GB and 32GB variants for $399 and $499, respectively, or essentially $100 less than a comparable iPad with Retina display. That price coupled with the device’s high-end specs make this -- at least on paper -- the Android tablet to have in the upper end of the spectrum. But while Android has been incredibly successful in the smartphone arena it still needs to up its game when it comes to tablets, specifically with apps designed with tablets in mind rather than stretched out versions of their smartphone counterparts.
It will be available November 13th in the US, UK, Australia, France, Germany, Spain and Canada.

Other announcements

In addition to the new hardware, Google also announced updates to its voice assistant feature Google Now, which now offers flight information, restaurant reservations, hotel confirmations and shipping details. Meanwhile, Google Play is getting new video content and is launching the music store in Europe.

Built-in advertising: The Windows 8 feature you haven't heard about

Windows 8 has been one of the most anticipated and talked about tech launches of 2012. Discussions intensified as the operating system neared and for the most part, everything went off swimmingly for Redmond. Sure there was the post-RTM update ahead of Microsoft’s October 26 release date but there’s something else with Windows 8 that most aren’t yet aware of: built-in advertising.
The advertisements are reportedly found inside some of the applications that ship with Windows 8 under the Modern UI (Metro) user interface like Finance, News, Travel and Weather. Advertisements in free mobile apps or even trial software are perfectly understandable, but how should you feel about finding ads inside software you paid full price for?
Several prominent figures from around the web are voicing their opinion on the issue, both in defense of the ads and against them. As ZDNet highlights, John Gruber from Daring Fireball simply believes it’s “gross.”  But it’s not just Mac fans that feel that way as Paul Thurrott from Supersite for Windows essentially believes it cheapens the operating system.
ZDNet’s Ed Bott doesn’t feel the issue is nearly as big of a deal as Gruber and Thurrott, however. Instead of seeing this as another revenue stream for Microsoft at the expense of paying customers, he says the ads are simply part of a project from Microsoft designed to inspire Windows 8 app developers.
Granted, the ads themselves aren’t terribly obtrusive. In fact, most say you have do a little digging to find the ads which is probably why we haven’t publically heard about them sooner. As Bott points out, the ad in the News app is found by swiping through seven full screens in landscape move. It’s similarly placed in the Sports app shown above as well.
Have you had an opportunity to try Windows 8 and if so, have you noticed the ads before? How do you feel about them being in a piece of software you’ve already paid full price for?

Loophole enables anyone to get a Windows 8 license for free

Copies of Windows 8 Pro are freely available from Microsoft’s website for anyone who wants to try out the operating system. Normally, the software would expire after 180 days, a period that is meant to allow Volume Licensing customers to automate and manage the activation process. But a loophole in the company’s Key Management System allows anyone to legitimately activate their copy of Windows 8 permanently, for free.
The goof centers around the Windows Media Center upgrade that’s being for free offered by Microsoft themselves until January 31 next year. Specifically, when entering the add-on key, Microsoft’s Key Management System will let you fully activate your copy of Windows 8 without running a validity check for the product key of the underlying system the Media Center add-on is being installed on.
To get a free Media Center key all users need to do is request it from Microsoft’s website using any email address. Once the code is in your inbox, do a search for “Add features to Windows 8” under Settings, click on it and enter the product key. Media Center will download and install, and after your system comes back from a reboot, you’ll be able to use the same upgrade product key to activate Windows.
With this your copy of Windows 8 will become fully active and 'legitimate', which you can verify in the activation window where it should read “Windows is activated” instead of “Windows is activated until…”.
The method has been confirmed to work by several news outlets. I tried it as well but upon requesting a Media Center key the site responded it will be emailed to me “within 24 hours” -- I can’t tell if the wait period is standard or if Microsoft is moving to patch the flaw by implementing a check for the underlying system.

Microsoft Security Essentials bombs tests, loses AV-Test certificate

eset, mcafee, bitdefender, avast, windows 8, antivirus, malware, benchmark, nod32, avg, norton, anti-virus, av, msse, microsoft security essentials, windows 8 rt, avira, viruses, windows defender, windows rt, it security, kasperksy, av-test, virus detection, tests, -te Microsoft Security Essentials was the only entry to fail AV-Test's certification between September and October -- an embarrasing slip for the once well-regarded virus protection solution. MSSE received a total of 10.5 out of 18 possible points, most notably falling short in zero-day malware attacks. As a point of reference, 11 points are required to receive certification. The fallen AV only received 1.5 out of 6.0 for system protection, but fared better when it came to repairing infections and usability: 3.5 and 5.5 out of 6.0, respectively.
Thankfully, other free alternatives performed better: Avast (14 points) edged out AVG (12.5 points) and Avira (12 points), receiving above-average marks all-around. Meanwhile, Bitdefender topped payware offerings, netting an almost perfect score of 17 points.
If you're somehow not familiar with it, MSSE is Microsoft's nag-free, no-cost anti-virus solution for Windows XP, Vista and 7 owners. Although Windows 8 users can't install MSSE, the utility essentially comes integrated into the OS -- it's simply disguised as "Windows Defender".
AV-Test is an independent German organization who, amongst other things, rates anti-virus utilities based on various metrics about every two months. AV-Test's certification is by no means an industry requirement, but their test results have served as a standardized way to benchmark anti-virus programs for years.
Similarly, AV Comparatives is another firm who offers their own, indepedent anti-virus grading service. After recalling MSSE scoring very high marks with AV Comparatives back in 2009, I checked out the site's latest tests to get a second opinion. Curiously though, MSSE has been missing from tests at AV Comparatives since 2010. Looks like we'll have to take AV-Test's word on this one.

Data shows Windows 8 hasn't stimulated PC gaming as anticipated

Microsoft and a number of partners had high hopes for Windows 8. The recently-released operating system was expected to be the savior for desktop computer, among other things. It’s still too early to determine if those lofty expectations will be realized but one thing is apparently evident already: Windows 8 is not a hit with gamers.
New data from NPD Group shows that PC game sales are down a full 21 percent in the month following Windows 8’s release when compared to the same time period in 2011. Stephen Baker from NPD said Windows 8 hasn’t made the market any worse but it certainly hasn’t helped to stimulate sales either.
NPD isn’t the only one to produce early data on Windows 8’s impact on gaming. Valve offers gamers the opportunity to take a voluntary survey each month to evaluate the hardware that people are using to run the client and games.
Valve’s latest monthly Steam survey shows that only 0.44 percent of client users have upgraded to the new OS. Based on 54 million active Steam users, that boils down to just 237,600 players that are now running Windows 8. It’s worth pointing out that this isn’t likely an accurate representation but it is pretty telling about the state of Windows 8 gamers, or lack of.
A number of game developers have spoken out against the operating system since it was first announced due to the fact that Microsoft is trying to make it a closed platform. Case in point – if a developer wants to create and submit a game for inclusion in the Windows 8 Store, they have to follow certain guidelines and store rules to do so.
Of course, publishers can still create and sell games outside of the Windows 8 Store but it would be a lot easier to provide digital downloads inside the Windows 8 ecosystem.

Bug in Snapchat and Facebook Poke lets recipients save video files

A new bug has been discovered that allows the recipient of a Snapchat or Facebook Poke video to revisit and keep it forever without the sender ever knowing it. All that’s needed to save videos is an iPhone or iPad, a data cable and a free file browser.
The process is pretty straightforward and can be done by virtually anyone. First, open the app and load a video but don’t open it. Then, plug your device into your computer and open an iPhone file browser, like iFunBox. From here, navigate to the Snapchat folder and look for the “tmp” folder. If you’re using Facebook Poke, the files will be buried a bit deeper in library/caches/fbstore/mediacard. Once they have been located, simply copy them and paste them to your computer. It’s as easy as that.
Snapchat founder Evan Spiegel told Buzzfeed that people who most enjoy using Snapchat are those who embrace the spirit and intent of the service. He said there will always be ways to reverse engineer technology products but it spoils the fun.
Snapchat launched in September 2011 with absolutely no media coverage. The idea behind the app is that you can share a photo or a video with someone for a set amount of time – up to 10 seconds. When the preset time limit has expired, the media is then deleted from both devices as well as Snapchat’s servers. Sure it’s possible for someone to capture a screenshot but like other apps, the sender is notified in such an event.
There are essentially two camps when it comes to the intended use of such an application. Some will say it’s innocent in nature, allowing users to send silly or goofy photos to friends or family that they otherwise wouldn’t send over social media or SMS. Others, however, see Snapchat as little more than an app to facilitate sexting. We’ll leave you to draw your own conclusion as to what you believe people are using it for.
The app now has a solid following, with over 50 million snaps being shared each day. In fact, Facebook essentially copied the entire idea and released it as a social media app called Poke not too long ago.

Windows 8 Boot Issues? Try Fixing the Master Boot Record (MBR) or Boot Configuration Data (BCD)

Windows 8 Boot Issues? Try Fixing the Master Boot Record (MBR) or Boot Configuration Data (BCD)Windows 8 received a decent amount of enhancements on the desktop side that I tend to appreciate versus running Windows 7, even if that means I get Metro standing in the middle here and there occasionally. One such area of improvement is notification management and how it handles updates and system restarts. Running the final version of the OS for a few months now, it’s been a painless affair until this past weekend.
I shut down my desktop PC with the purpose of connecting new hardware and on the way out I was prompted to “update and shutdown”. Sure, why not. I went on to install a secondary SSD for maintenance purposes and apparently that was enough for my system to refuse booting right after. I tried to backtrack to no avail.
"Reboot and select proper boot device"
I bet you have no love for the message, neither do I.
Because I had disconnected a few devices, it took me a while to narrow things down to my boot SSD, and for a second I even thought the SSD had gone forever kaput. After booting with a different drive and noting I could read all my data on the drive in question, I took a deep breath and started to troubleshoot the boot record. Once you settle on the idea that it’s not a hardware problem and you are unable to boot up, your best bet is to try to fix the MBR (Master Boot Record).
With a long history of dual booting different versions of Windows over the years, finding a corrupt MBR, boot sector, or Boot Configuration Data (BCD) is nothing new, but it took me longer than usual to come to a solution. Here are a few things you can try and hopefully get back to full speed in no time.
First of all, you will need a bootable disc or pen drive. Here’s a quick guide to accomplish that if you don’t already have one handy. Although it's not a requirement, to be on the safe side it's recommended at this point that you disconnect other storage devices from your PC and leave only the SSD/HDD that you are troubleshooting.
Booting into the Windows 8 setup, select “Repair your computer” in the bottom part of the window, then “Troubleshoot” and “Advanced options”. Here I was given a good reminder of another cool Windows 8 feature. If you have a restore point created you can go back to that working copy of the OS without losing your data. Well, I didn’t have any.
So the first thing you will want to try is the Automatic Repair.
If that fixes your boot problem, you had it easy and go on to create a restore point for another time you are out of luck. If Windows is unable to fix your issue, read on.
Go back to the Advanced options and choose the Command Prompt. Going for the next easiest way to fix the problem, enter the following four commands into the prompt:
bootrec /fixmbr
bootrec /fixboot
bootrec /scanos
bootrec /rebuildbcd
After receiving a success confirmation. Close the CMD window and restart your PC.
If you are booted into Windows, excellent! If not, let’s try one last thing. Follow the previous steps until you have landed into the Command Prompt.
Enter the “bcdedit” command. A lists of items will appear under Windows Boot Manager and under Windows Boot Loader. Look for the following items:
  • Under Windows Boot Manager, the Device item should be set to unknown.
  • Under Windows Boot Loader, the Device and os device items should be set to unknown.
Run the following three commands to correct the settings:
bcdedit /set {default} device partition=c:
bcdedit /set {default} osdevice partition=c:
bcdedit /set {bootmgr} device partition=c:
One last thing to try (though in theory, it's the repeating what we’ve done before) browse to the folder X:SourcesRecovery and then enter “StartRep.exe” which executes another automated startup repair utility.
 tech tips on TechSpot.

Nvidia's GeForce Experience PC game optimizer enters open beta

gtx, nvidia, geforce, gpu, graphics, fermi, gaming, graphics card, kepler, pc gaming, geforce experienNvidia has opened the doors on its GeForce Experience after letting thousands of users hammer on it over the last month. Announced last April and introduced as a closed beta in December, the PC game optimizer aims to help players get the most out of their machines by automatically adjusting in-game settings for their hardware.


When the initiative was first revealed, Nvidia cited a survey that suggested more than 80% of users play PC games in their default configuration, presumably because they're either intimidated by the myriad of quality settings or they simply don't care to invest the time necessary to find a decent configuration for their particular system.
When the closed beta began last month, the GeForce Experience only supported 32 games, and while that number hasn't increased by much, Nvidia has added nine more titles to its database, including Far Cry 3, Mechwarrior Online and Hawken. You'll still need a Fermi or Kepler-based graphics card, though the software now offers limited support for Core 2 Duo and Core 2 Quad processors, which weren't backed before.
Nvidia says other changes since the closed beta include enhanced game detection logic, support for optimizing games played on 2560x1440 displays, better Chinese, Danish and UK English translations, improved client startup, billboard display, game scan and communication with Nvidia's servers, as well as with various bug fixes. The company previously outlined its six-step game testing process and we'll list that again:
  1. We start with expert game testers that play through key levels of the game (indoors, outdoors, multiplayer etc.) to get a feel for the load and how different settings affect quality and performance.
  2. The game tester identifies an area for automated testing. This area will be from a demanding portion of the game. We don’t always select the absolute worst case since they tend to distort the results.
  3. As part of the game evaluation, the expert game tester will identify an appropriate FPS target. Fast paced games typically require higher FPS. Slower games lower FPS. We also define and test against a minimum FPS to minimize stuttering. The average framerate target is typically between 40-60 FPS, the minimum 25 FPS.
  4. The most difficult part of OPS is deciding which settings to turn on and which to leave off in a performance limited setting. This is done by analyzing each setting and assigning them quality and performance weights. The game tester compares how each setting (eg. shader, texture, shadow) and each quality level (eg. low, medium, high) affects image quality and performance. These are stored as weights which are fed to the automation algorithm.
  5. From here on the testing is automated. The GeForce Experience supercomputer tests the game by turning on settings until the FPS target is reached. This is done in the order of maximum bang for the buck; settings that provide the most visual benefit and least stress on the GPU (eg. texture quality) are turned on first; settings that are performance intensive but visually subtle (eg. 8xAA) are enabled last.
  6. Finally, the GeForce Experience supercomputer goes through and tests thousands of hardware configurations for the given game. Unique settings are generated for each CPU, GPU, and monitor resolution combination.

AMD Catalyst 13.4 (WHQL), 13.5 (Beta) ready for download

amd, software, download, gamers, beta, gaming, whql, pc gaming, downloads, catalyst drivers, amd catalyst, beta drivers, tressfx, 13.4, catalyst 13.4, catalyst 13.5 beta 2, radeon 7000 seri
AMD has released two new sets of drivers for Radeon graphics card owners, namely Catalyst 13.4 and 13.5b2. The former driver bundle is WHQL-certified while the latter remains in beta; however, both offer the usual crop of bug fixes and performance improvements.


Download AMD Catalyst 13.4 (WHQL)
Note: All packages work with both desktop and mobile GPUs
Catalyst 13.4 promises all the enhancements made in the 13.3 beta, but adds a number of noteworthy profiles and bug fixes:
  • The Walking Dead:  Survival Instinct:  Fixes image quality issues when enabling Anti-Aliasing through the AMD Catalyst Control Center
  • Crysis 3:  Improves CrossFire performance in 3 and 4 GPU configurations
  • Deus Ex:  Human Revolution:  Improves CrossFire performance
  • Unigine Heaven:  Improves CrossFire performance in 3 and 4 GPU configurations
  • Hitman Absolution:  Resolves application issues on the AMD Radeon HD 7790 when running at 1680x100 with 8xAA enabled
  • Call of Duty: Black Ops 2: Fixes object and texture corruption
  • Adobe Photoshop CS6: Resolves screen flicker under Windows 8
AMD promises 13.4 will "significantly improve" latency for Skyrim, Borderlands 2, Guild Wars 2, Tomb Raider and Hitman Absolution. The entire Radeon HD 7700 series should see performance gains in Batman Arkaham City (~5%), Borderlands 2 (~10%), Quake Wars (~13%), Hitman Absolution (~11%), Wolfenstein MP (~11%) and Civilization V (~5%).
Support for the AMD Radeon HD 7790 and Radeon HD 7990 have also been added.
Download AMD Catalyst 13.5 (BETA 2)
Note: All beta packages include 32-bit + 64-bit support
Meanwhile, AMD's latest beta driver, Catalyst 13.5, packs all of that plus even more boosts in performance for Radeon HD 7000-series owners. Bumps include Far Cry 3 with AA (~4%), Shogun II with AA (~20%), Tomb Raider (~6%), Bioshock (~6%) and Borderlands 2 (~17%).

AMD Catalyst 13.5 Beta 3

II7gJ.jpg
AMD Catalyst 13.5 Beta 3 (Notebook)

Build Info:
Catalyst Version: 13.5
Direct3D Version: 9.14.10.0968
OpenGL Version: 6.14.10.12198
OpenCL Version: 10.0.1124.2
Catalyst Control Center Version: 2013.0416.1036.17145


AGWKt.jpg?1
NOTE! You must un-install AMD Catalyst 13.4 (if you have already installed AMD Catalyst 13.4) before installing AMD Catalyst 13.5 Beta

Feature Highlights of The AMD Mobility Catalyst™ 13.5 Beta 3
  • Adds support for the AMD Radeon HD8000M Series

Feature Highlights of the AMD Catalyst™ 13.5 Beta
  • Performance gains seen on the entire AMD Radeon™ HD 7000 Series for the following:
» Far Cry 3: Improves performance up to 4% with Anti-Aliasing enabled
» Shogun II: Improves performance up to 20% with 8x Anti-Aliasing enabled
» Tomb Raider: Improves performance up to 6%
» Bioshock: Improves performance up to 6%
» Borderlands 2: Improves performance up to 17%
  • Corruption is no longer seen on the AMD Radeon HD 7790 when TressFX is enabled in Tomb Raider


System Requirements:
  • Windows 8 (32 & 64-bit versions)
  • Windows 7 (32 & 64-bit versions with SP1 or higher)
  • Windows Vista (32 & 64-bit versions with SP2 or higher)

AMD Product Compatibility:
  • AMD Radeon™ HD 7900 Series
  • AMD Radeon HD 7800 Series
  • AMD Radeon HD 7700 Series
  • AMD Radeon HD 6000 Series
  • AMD Radeon HD 5000 Series
  • AMD Mobility Radeon HD 7000M Series
  • AMD Mobility Radeon HD 6000M Series
  • AMD Mobility Radeon HD 5000 Series


5WxO8.png

AYVLn.png9F64q.gif?1 AMD Catalyst 13.5 Beta 2
cNnl2.jpg9F64q.gif?1 AMD Catalyst 13.5 Beta 3

App Porter helps translate iOS apps for other mobile platforms


Intel tool converts much of iOS apps to HTML5
In the convergence of Bring You Own Device and in-house app development, many agencies are overloaded with the task of creating apps for multiple platforms. An app that was created for use in one mobile operating system may need complete rewritten to be used in another. This effectively multiplies the work by the number of platforms that need to be supported.
Intel has come up with a partial solution, at least for apps that start out written for Apple’s iOS. The HTML5 App Porter Tool  has been in beta for a little more than a month now, and it has just started to get some traction with the mobile app development community. It will automatically convert the Objective-C code of iOS-based apps into JavaScript so that it can be more readily converted to work with other operating systems, such as Android, BlackBerry and Windows.
It will also rewrite layouts in HTML/CSS (Cascading Style Sheets), and convert iOS API data types and objects to JavaScript/HTML5. While this won’t automatically convert 100 percent of an app, it could save a lot of effort by translating as much as it can.
If you are interested in trying out the HTML5 App Porter Tool, you can sign up at Intel’s website.  You can also learn how to get the most out of what looks to be a quite useful tool with the tutorial and support forum.
The tool requires Windows 8 and Microsoft Visual Studio 2012.
Custom Search
Powered By Blogger